The most common question before signing up is not “what does it cost”, and it isn’t “where is my data” either. It’s this one: what do I have to touch on the customer’s box? Fair enough. Anyone looking after someone else’s Home Assistant, with a heating system, an alarm and the homeowner’s patience hanging off it, wants to know beforehand what happens on that machine.
So the guide lives here now, out in the open, instead of only behind the login. It’s the same text you get after signing up, under Resources in the app, word for word and with the same screenshots. Not a polished marketing flow with three steps and a rocket at the end, but the actual click path.
What you need: HACS on your customer’s Home Assistant, brief access to that system, and an account with us. That first way in you have to arrange yourself: on site at the machine, through remote access the customer already has, or on the phone together with them. The Fleet Manager is no help there yet, it is the result of the exercise. Once per customer you have to get through it, after that never again. Although: if you’re building and shipping the system yourself anyway, just pull the plugin forward. You’re sitting at the machine in the workshop regardless, and the hurdle is dealt with before the customer has even seen the box. Only for existing systems you take over is there no way around it.
What to budget: about a quarter of an hour. The Home Assistant restart is not the big item here, it is done in one to three minutes. Longer than that happens in practice only on systems still running off a spinning disk. The time goes into the click path and into looking things up.
One thing up front, because the guide itself only mentions it in passing: steps 1, 3 and 4 happen on the customer’s Home Assistant, step 2 happens in our app. So you switch over once and back once. Keep both open in two browser tabs and the agent key is copied in five seconds.
From here on: the guide.
Installation & setup: HA Fleet Manager Agent
This guide walks you step by step through connecting a customer’s Home Assistant system to HA Fleet Manager. The whole process takes about 15 minutes.
Overview
The setup consists of four steps:
- Install the plugin — add the “HA Fleet Manager Agent” via HACS on your customer’s Home Assistant.
- Create a customer — create a new customer in the app and copy the agent key.
- Connect — add the integration in Home Assistant and enter the agent key.
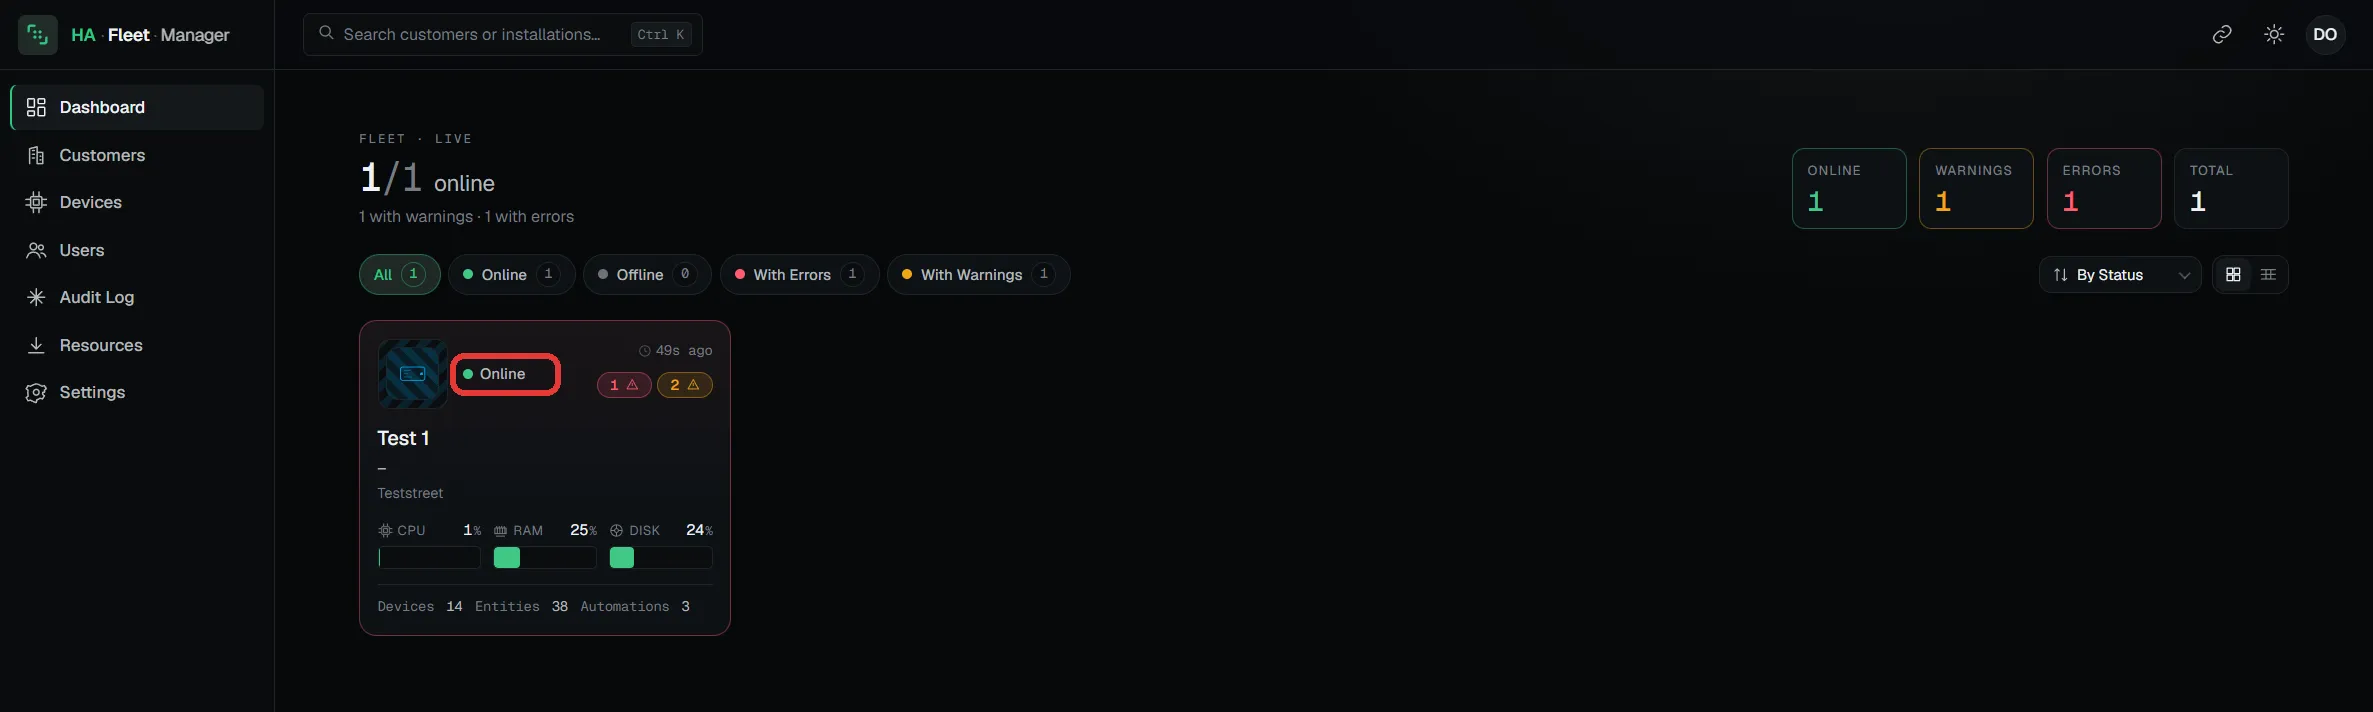
- Verify — the system appears as “Online” on the dashboard.
About the screenshots. The Home Assistant screenshots below show a German-language installation. The layout and button positions are identical in every language.
Prerequisites
- HACS (Home Assistant Community Store) is installed on the Home Assistant. If not, there are good video tutorials, for example this one in English.
- An HA Fleet Manager account on app.ha-fleet-manager.com.
- Access to your customer’s Home Assistant.
Step 1: Install the plugin via HACS
Copy the repository URL
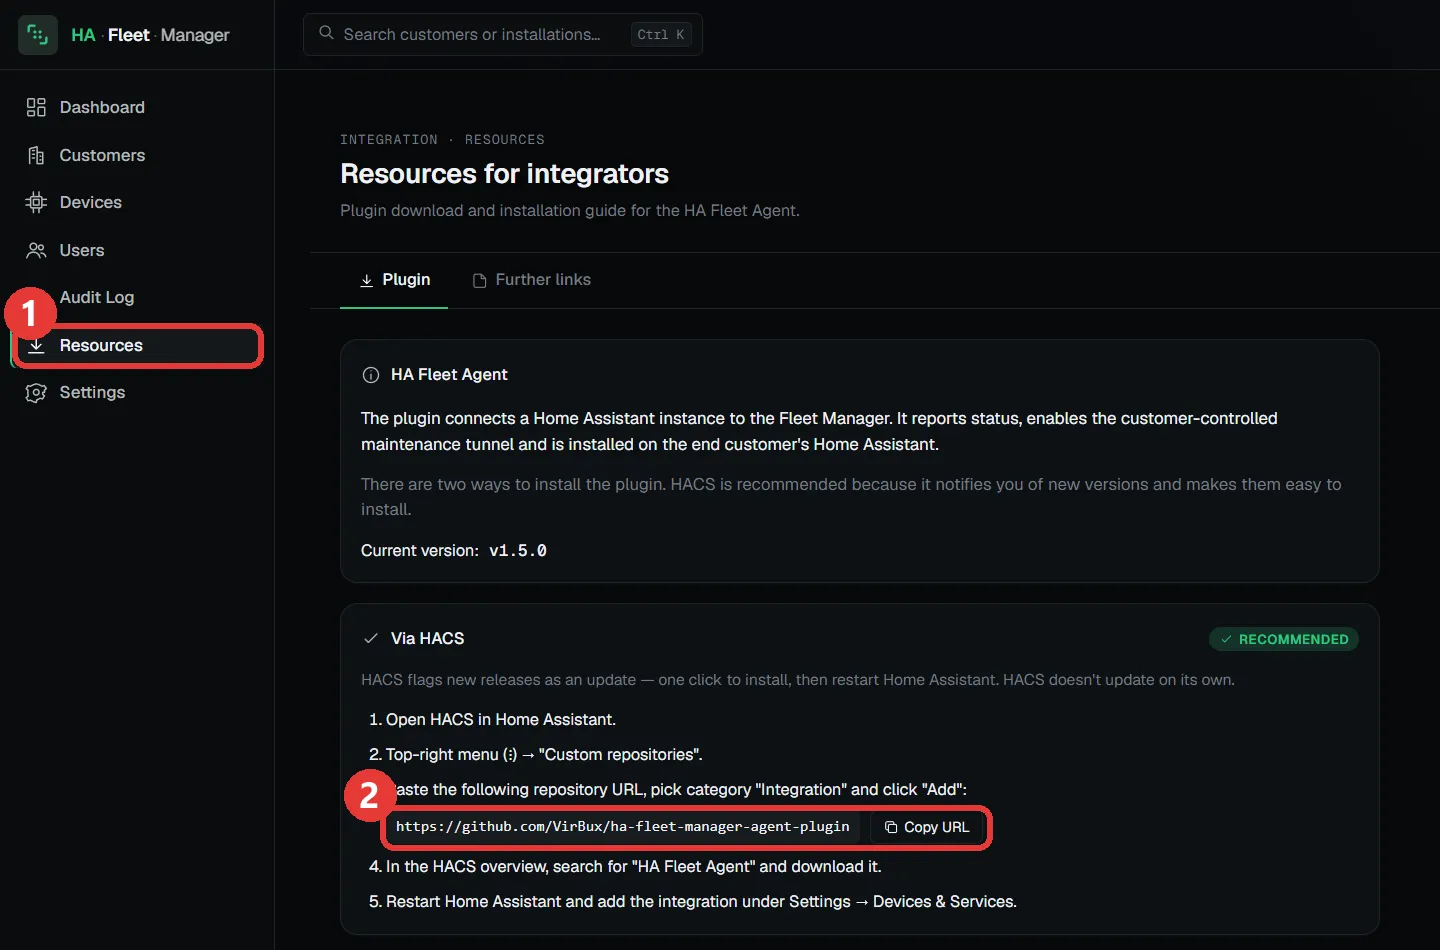
In the app, open Resources (1) in the side menu. Under “Via HACS” you’ll find the plugin’s repository URL, copy it to the clipboard with Copy URL (2).
Add the repository in HACS
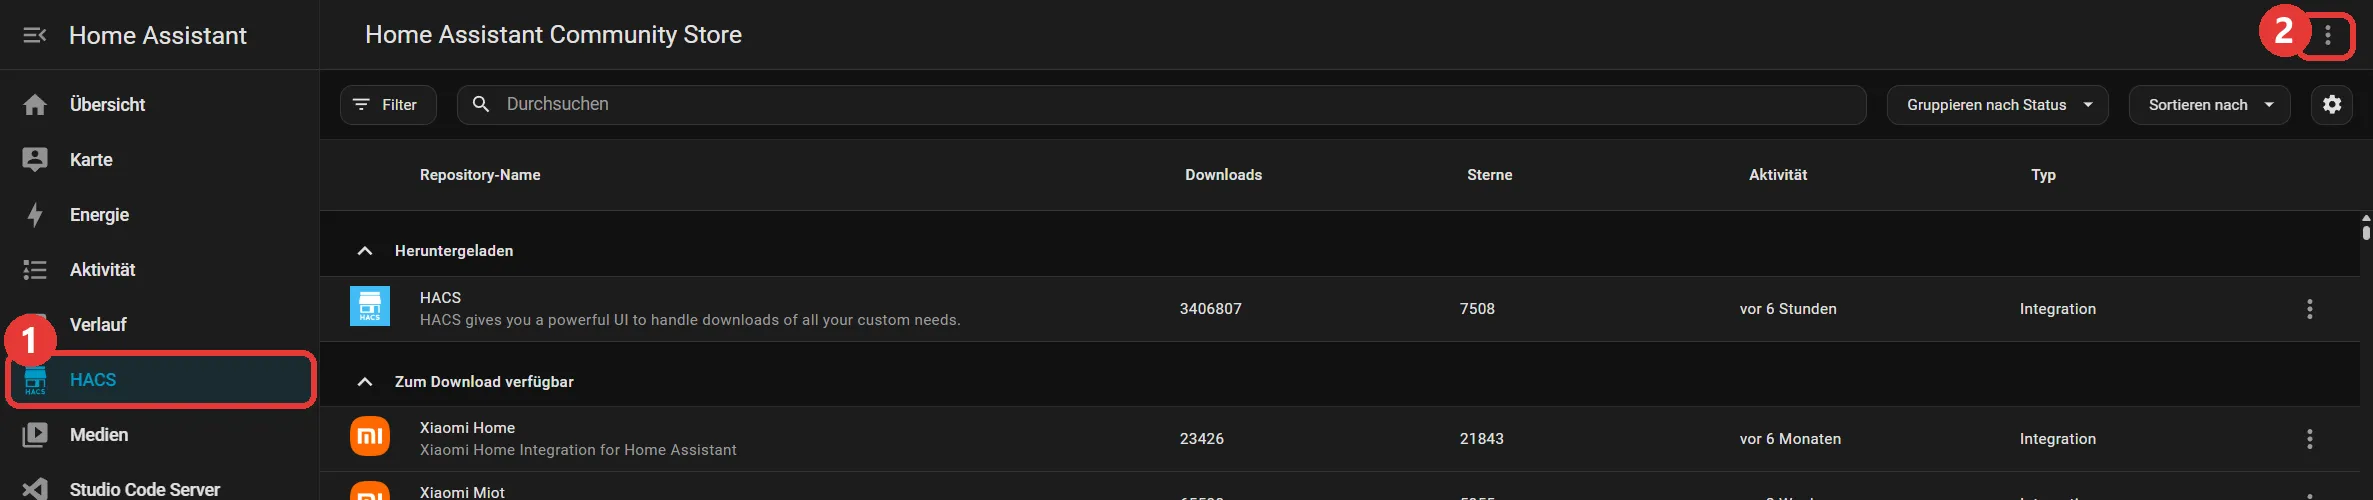
Switch to your customer’s Home Assistant and open HACS (1) in the side menu. Click the three-dot menu (2) in the top-right corner and choose Custom repositories.
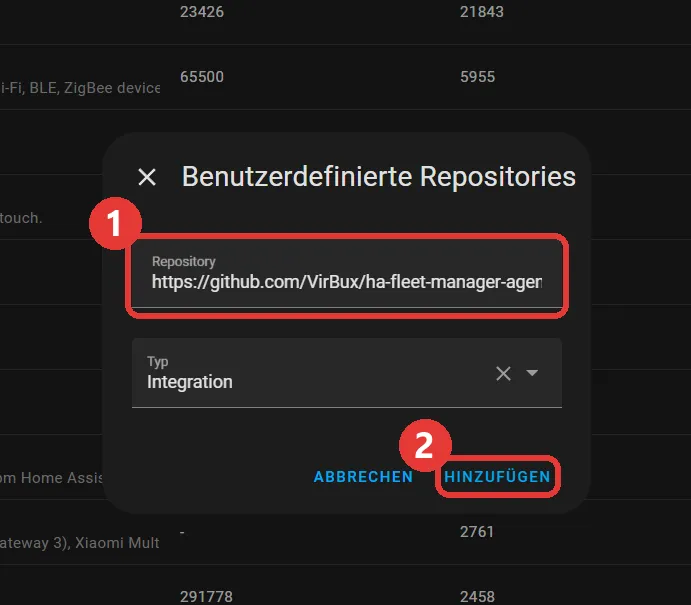
Paste the copied URL into the Repository field (1), select Integration as the type and click Add (2).
Download the plugin
Search HACS for ha fleet (1) and open the result HA Fleet Manager Agent (2).

Click Download, HACS automatically suggests the latest version, keep it.
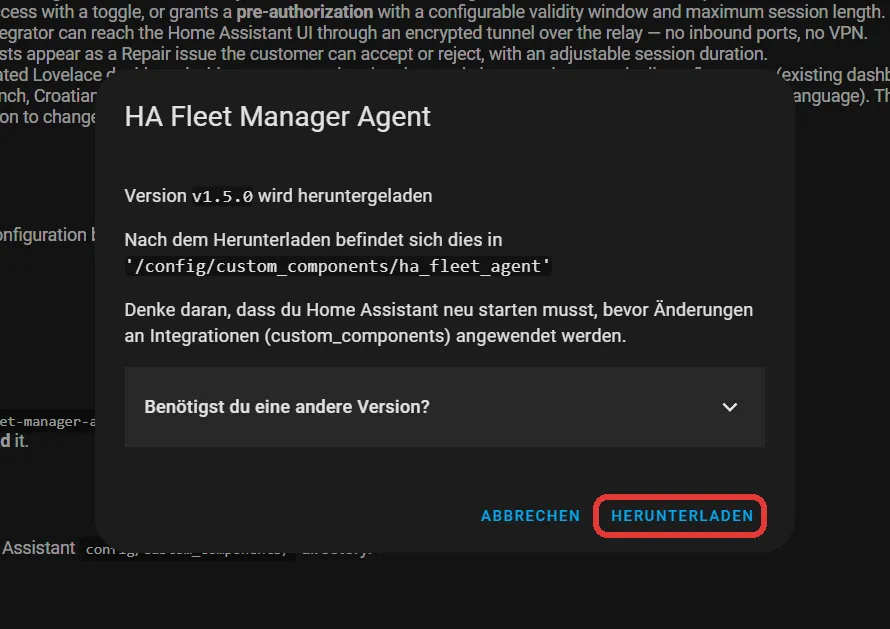
Restart Home Assistant. Restart Home Assistant after the download (Settings → System → Restart). Only then will Home Assistant recognise the new integration.
Step 2: Create a customer and copy the agent key
In the app, open Customers (1) and click New customer (2). Fill in the master data of the customer whose Home Assistant you just installed the plugin on, then click Create.

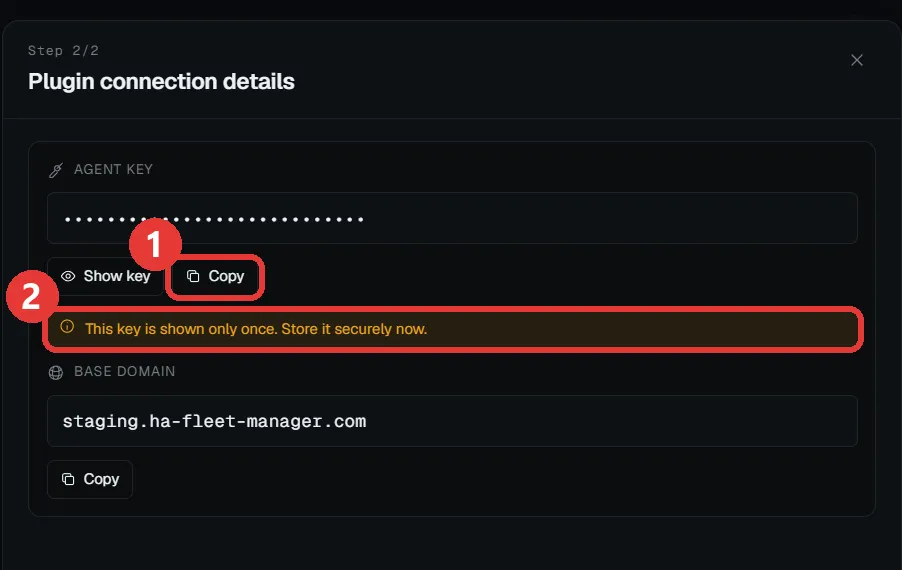
After creating the customer, the app shows the connection details for the plugin. Copy the agent key (1) to the clipboard.
The key is shown only once. Once you close this panel, the agent key can no longer be retrieved (2). Copy it now, you’ll need it in step 3.
Step 3: Connect
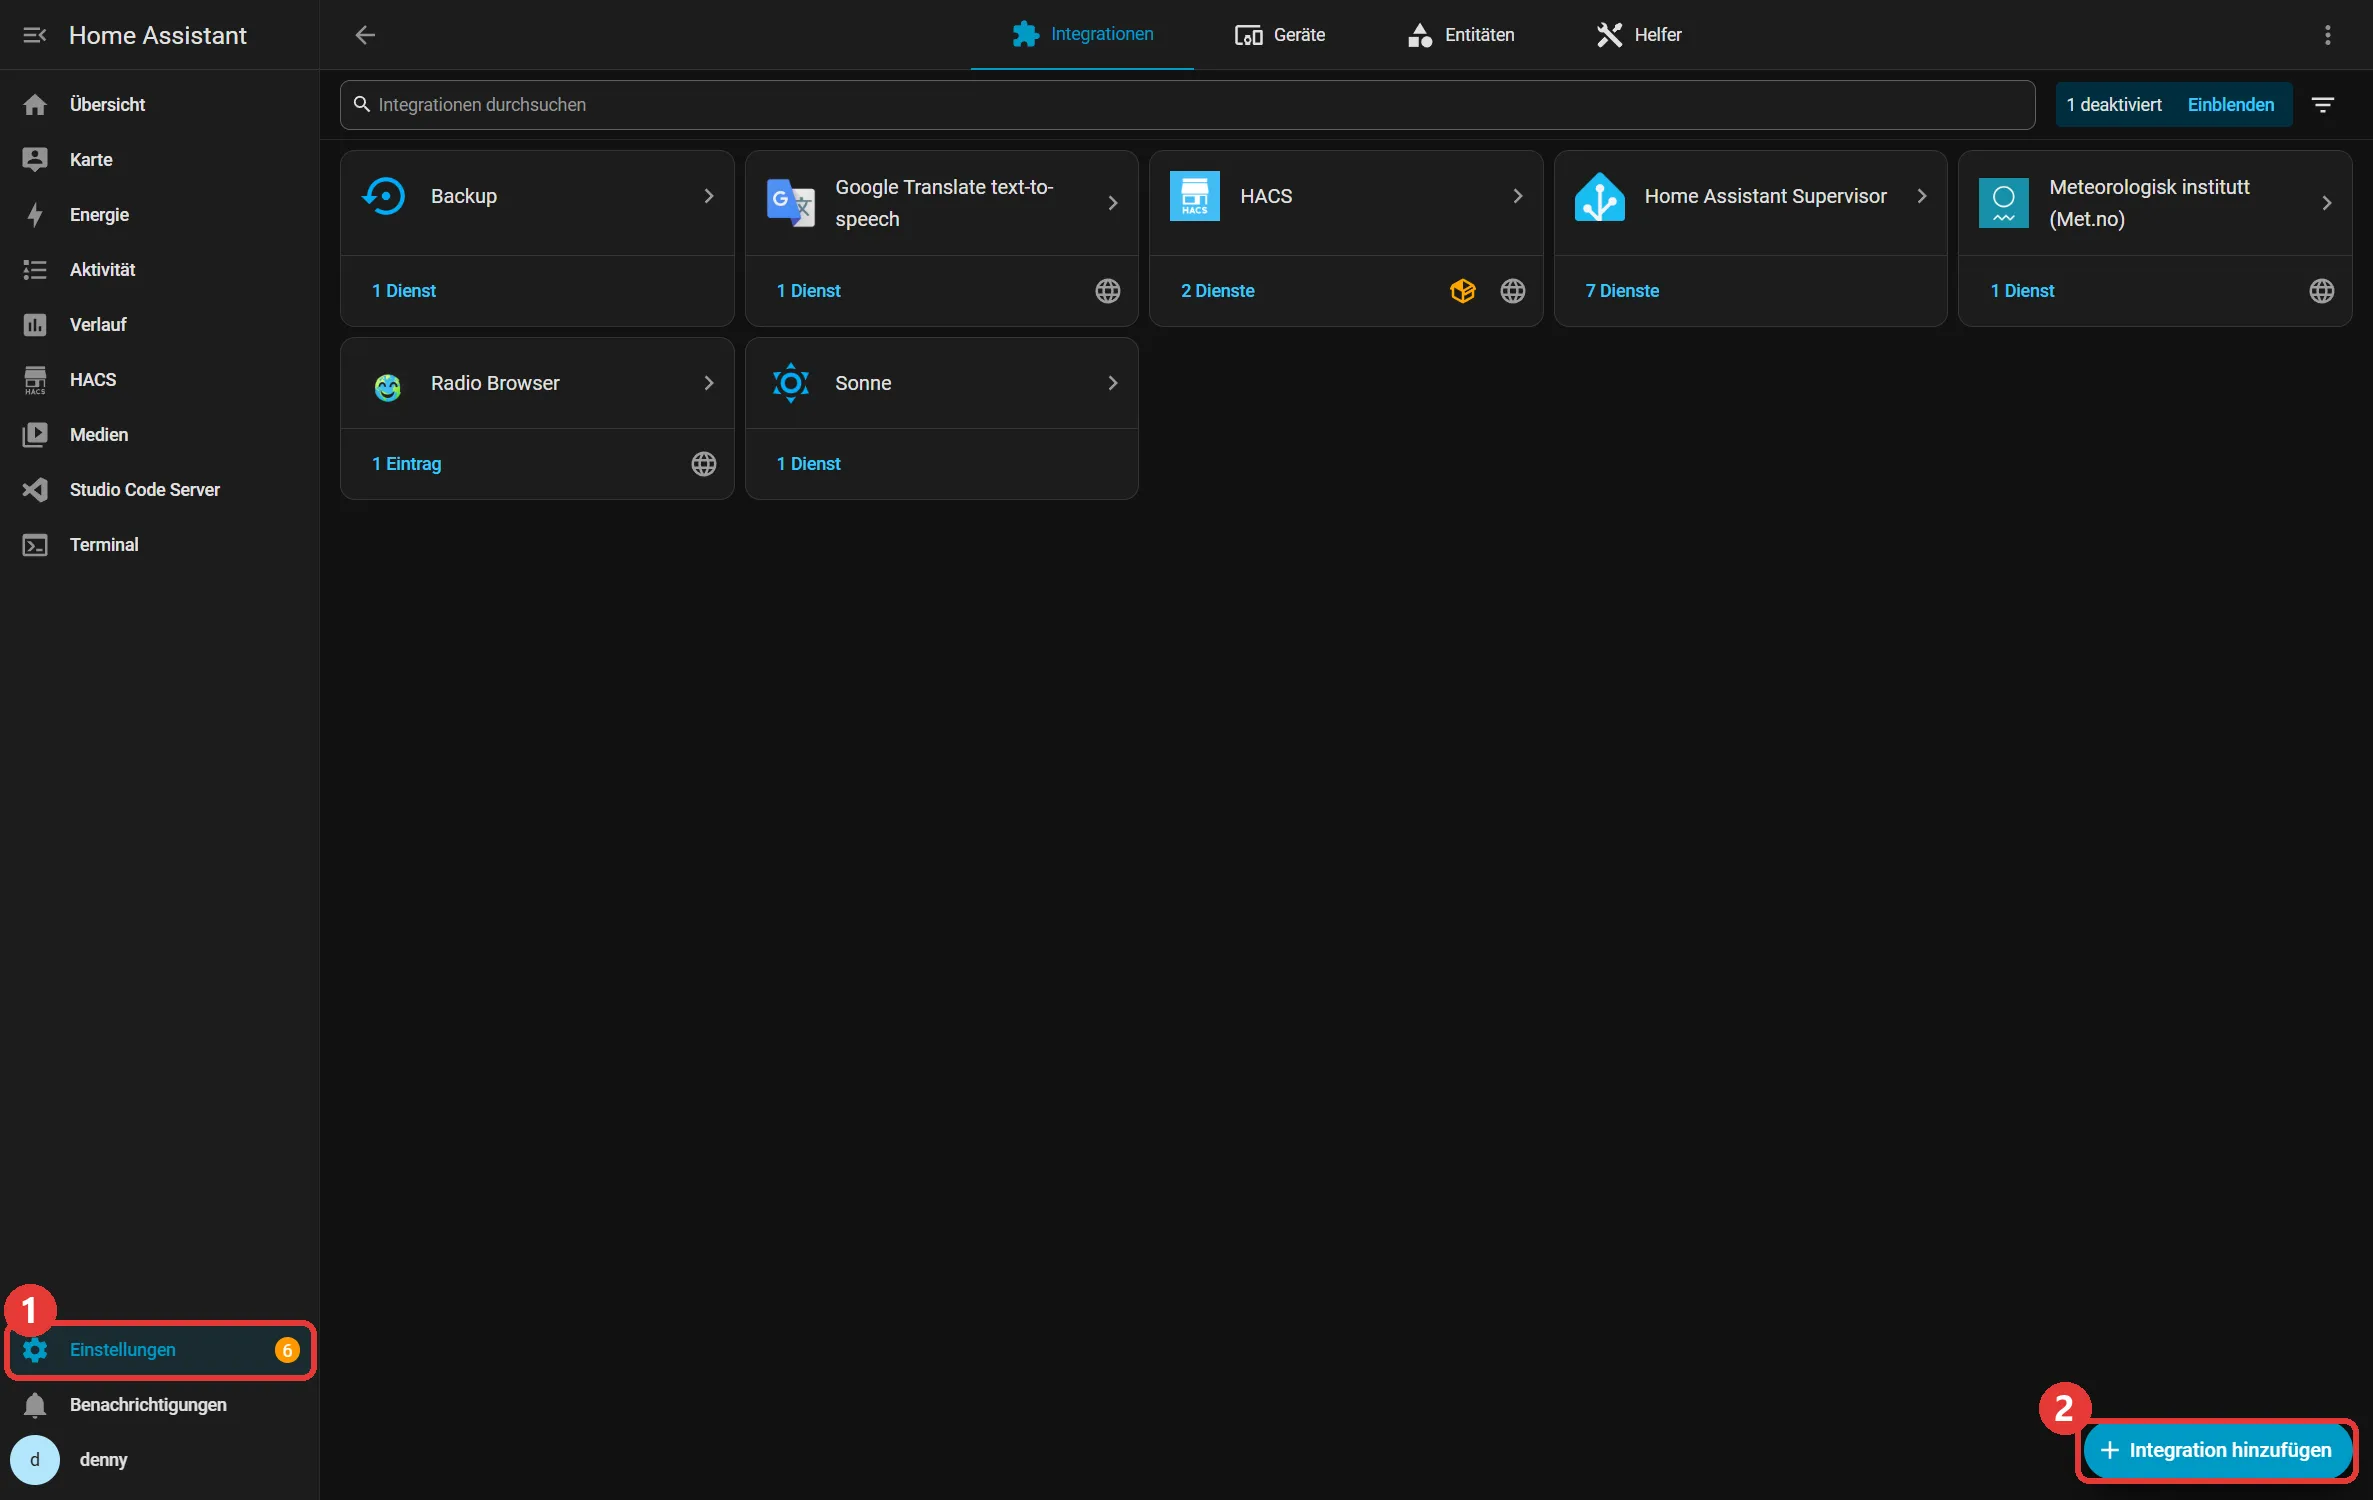
In Home Assistant, go to Settings (1) → Devices & services and click Add integration (2) in the bottom-right corner.
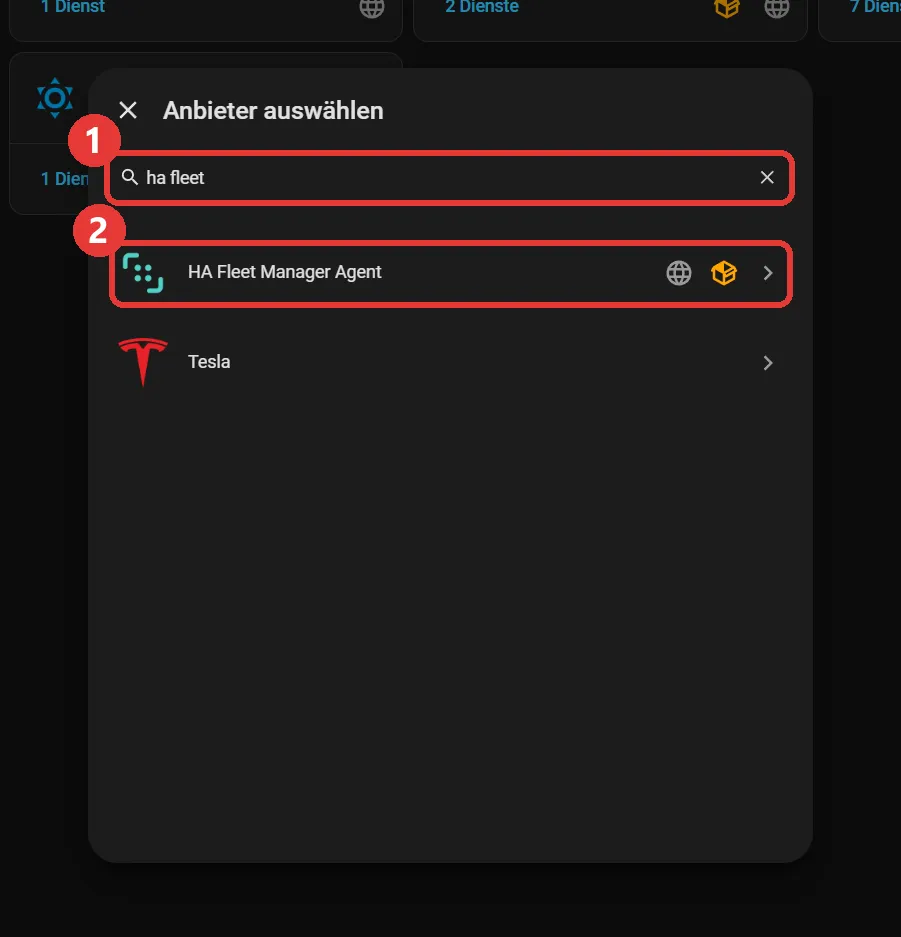
Search for ha fleet (1) and select HA Fleet Manager Agent (2).
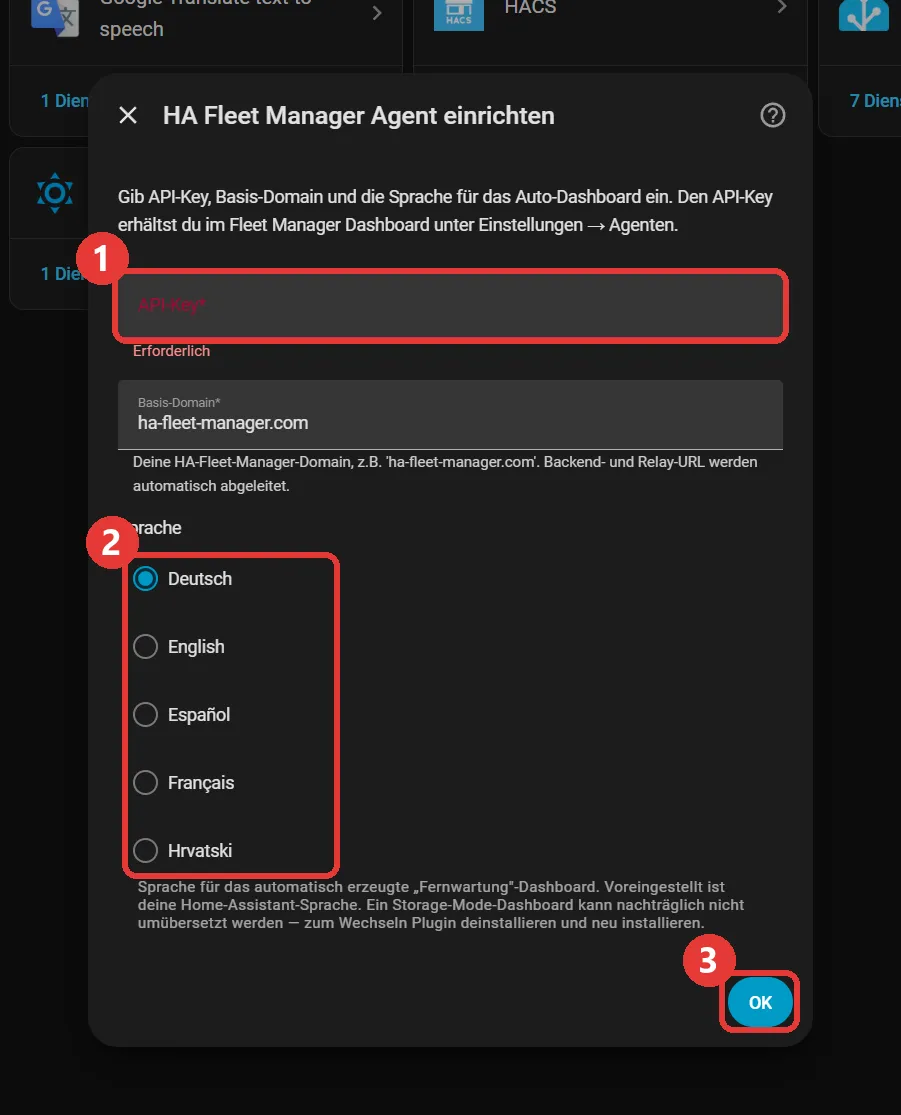
In the setup dialog:
- API key: Paste the agent key from step 2.
- Language: Choose the language your customer understands best. The auto-generated “Remote maintenance” dashboard will be created in it.
- Confirm with OK.
You can leave the base domain unchanged (ha-fleet-manager.com).
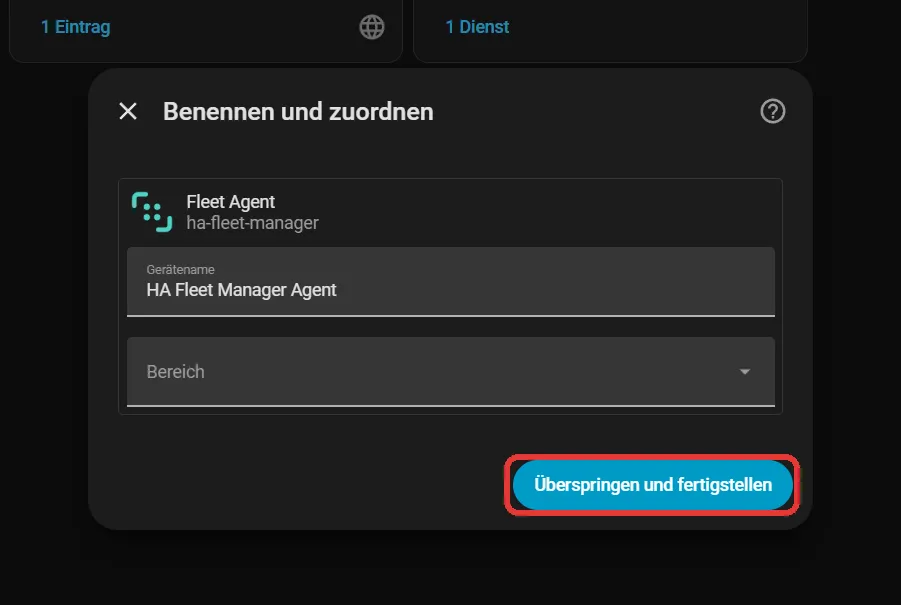
In the final “Name and organize” dialog you don’t need to change anything, simply click Skip and finish.
Step 4: Verify the connection
The connection is now established automatically. Open the Dashboard in the app, your customer’s system should appear as Online within about a minute.
Congratulations, you’ve connected your first system! 🎉
And from here?
The green dot on the dashboard is the actual moment things flip. From then on the installation reports in by itself: online status, CPU, RAM, storage, plus warnings and errors, without you logging in anywhere. Core, OS, add-ons and integrations get updated remotely, with a specific version choice and an optional backup first. And before you touch an update you can see whether that version has already wrecked someone’s database, because known drawbacks sit there curated and marked by severity ahead of the install. What that looks like in the interface: the tour in four screenshots.
From here on, no port stays open. The agent dials out, and the maintenance session is controlled by the end customer through the dashboard the integration created in step 3. For the install you just did you still had to reach the system yourself; from now on you don’t. Why that is architecturally the only version I sleep well with on someone else’s line is in remote maintenance without VPN and without an open port.
The second system, by the way, doesn’t take 15 minutes. The plugin has to go onto every instance, sure, and once again you have to reach the customer’s system yourself. But the looking-things-up falls away, and that is what eats most of the time on the first run.
If you want to try it: sign up for free, attach your first installation, done.
Problems or questions?
If something doesn’t work or you feel this guide is missing something, contact info@ha-fleet-manager.com.